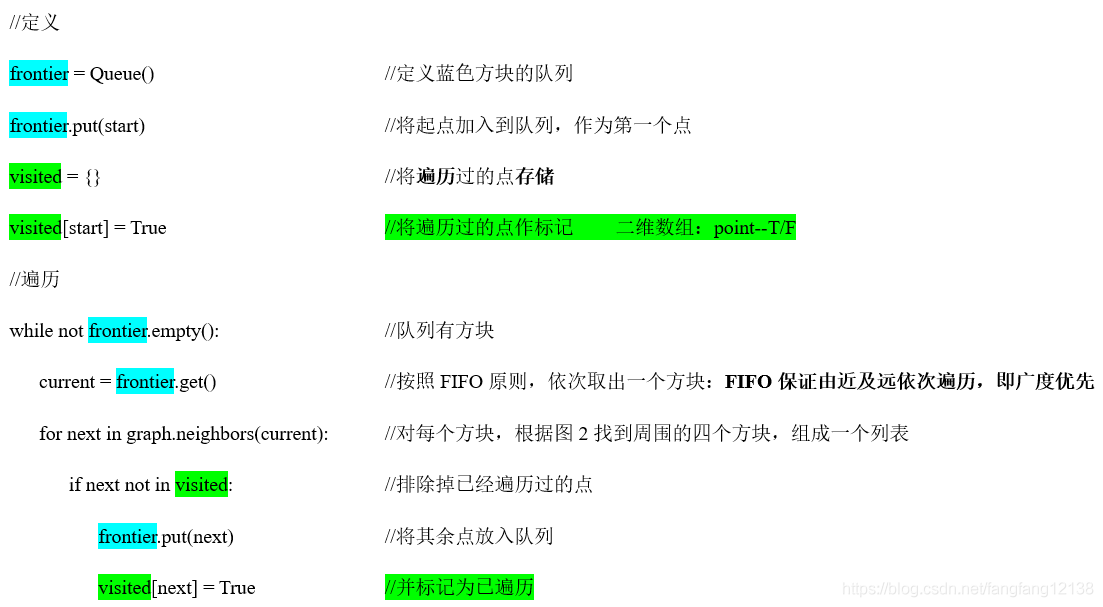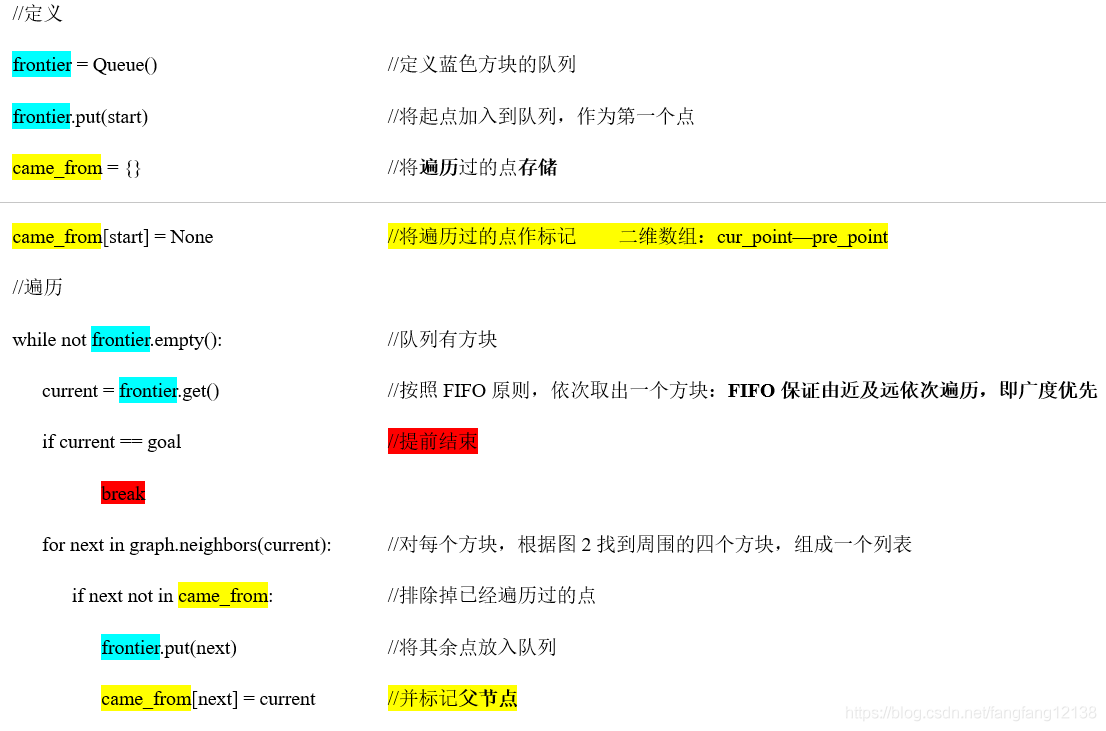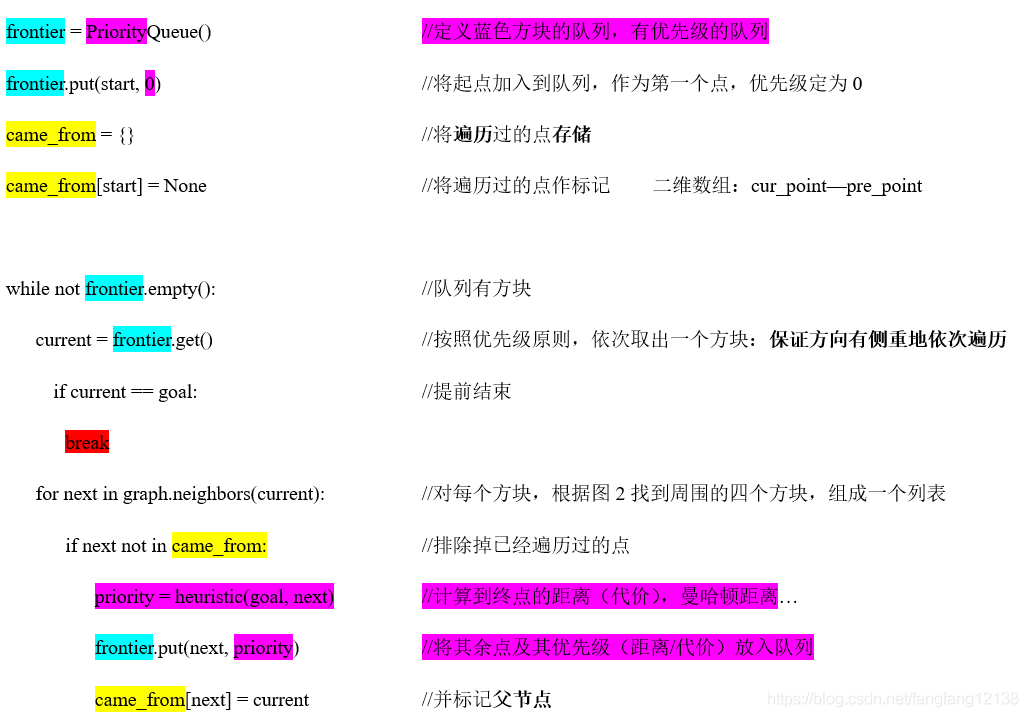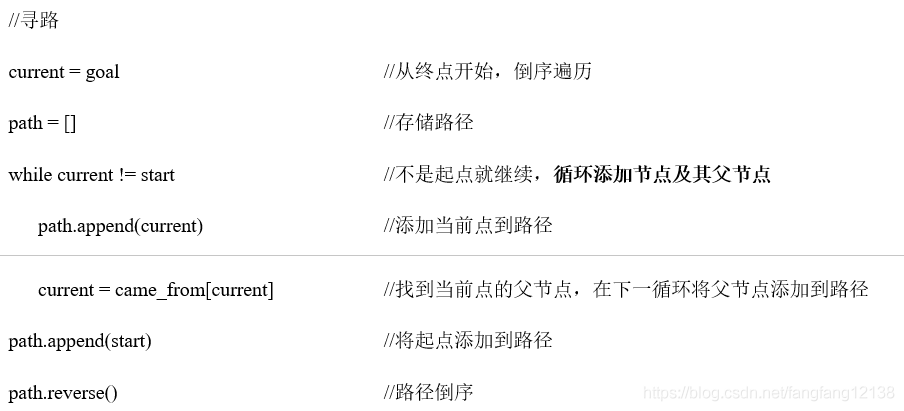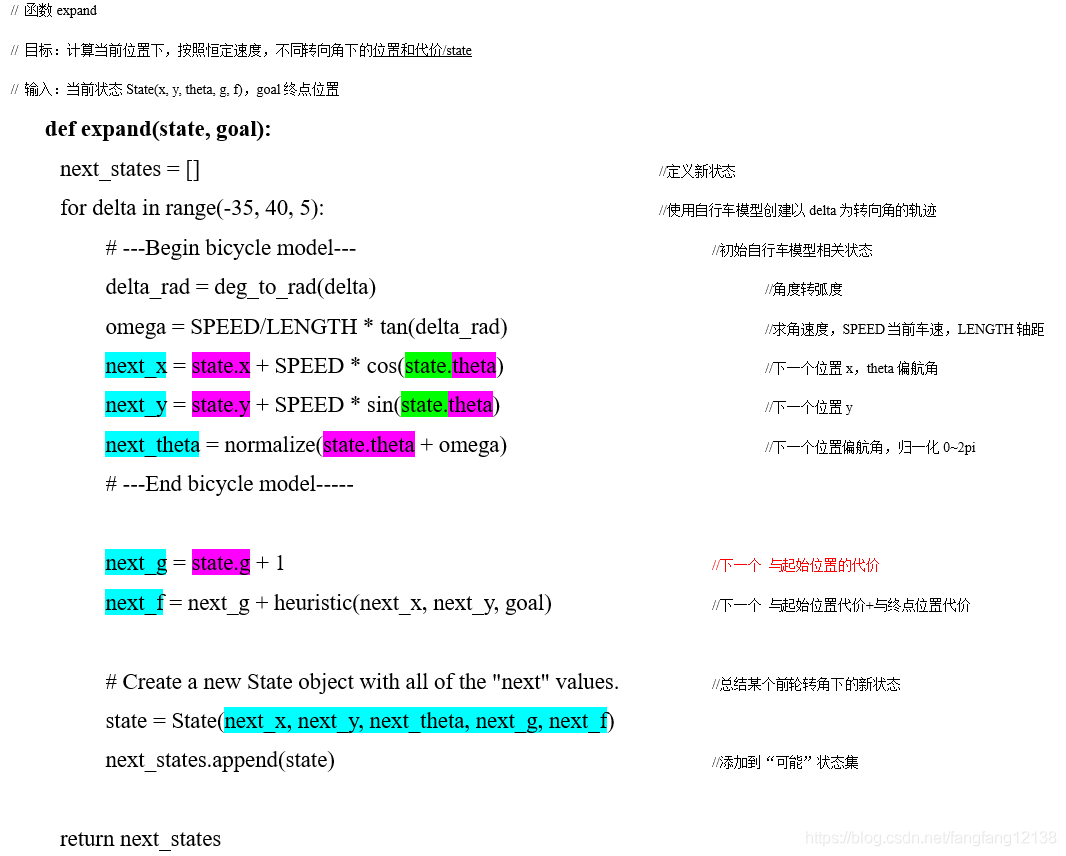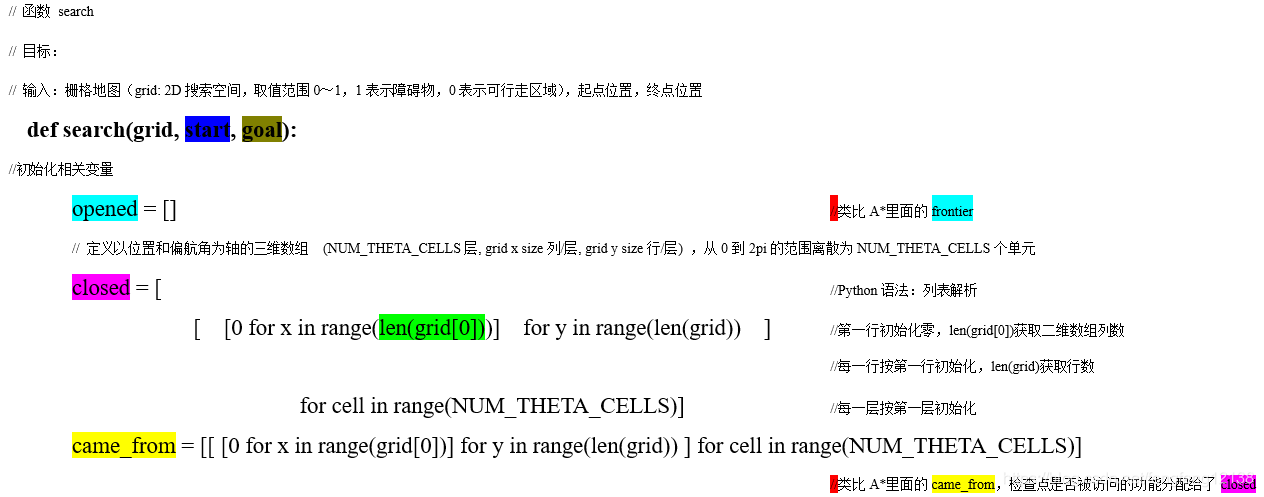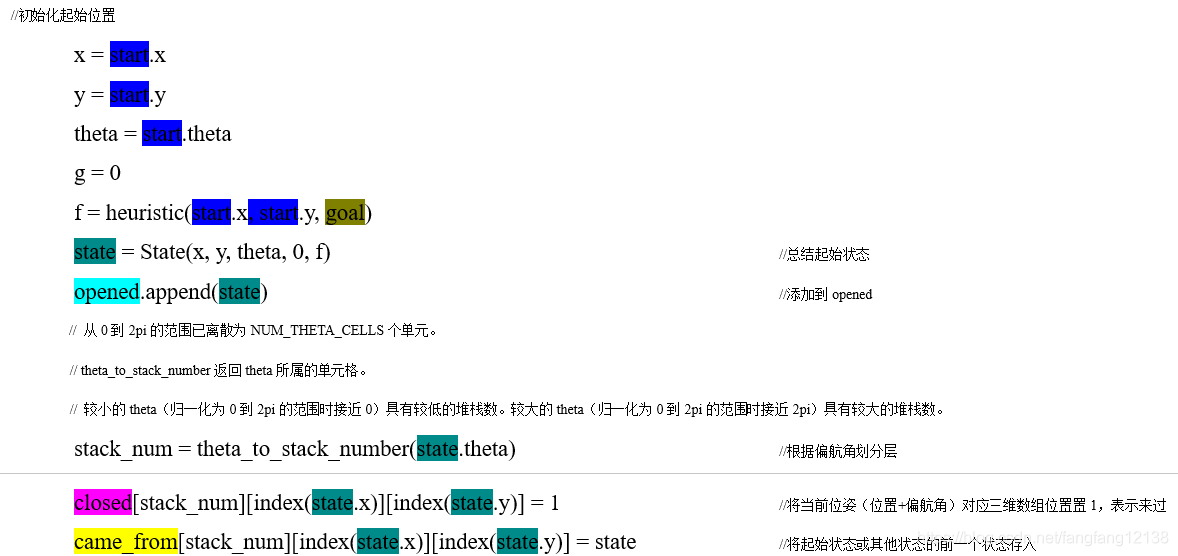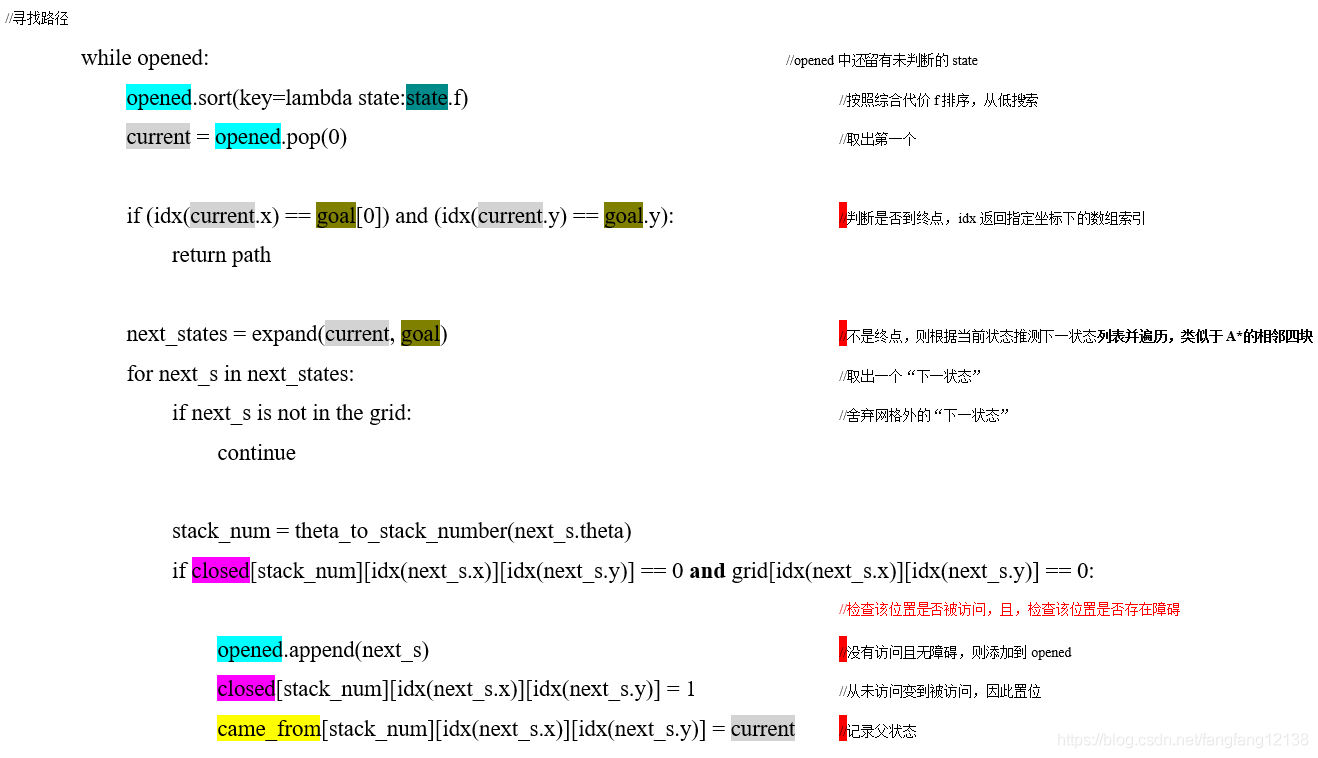
在这里分享了运动规划方面的一些基本的算法原理和伪代码实现,其中内容可能存在不完善和错误之处,如有读者发现,欢迎批评指正。
1、坐标系
- 一个机器人拥有多个坐标系,这些坐标系在tf2中构成坐标树,tf2通过坐标树维护多个坐标系之间的坐标变换。
- ROS坐标系为右手坐标系,前X、左Y、上Z。
- 两坐标系之间关系用6自由度相对位姿表示,tf2中由tf2::Vector3和tf2::Quaternion表示。
- 查看坐标树
# 方法一:view_frames工具 rosrun tf view_frames # 方法二:rqt rosrun rqt_tf_tree rqt_tf_tree - 查看坐标转换关系
# 变换关系 rosrun tf tf_echo /world /turtle1 - 查看坐标转换时间延迟
# 时间延迟
rosrun tf tf_monitor /world /turtle1
2、坐标变换
2.1、坐标变换
- 坐标变换库:tf2_ros,http://docs.ros.org/en/jade/api/tf2_ros/html/c++/namespacetf2__ros.html。
- 坐标转换消息类型:geometry_msgs/TransformStamped,包括父坐标系、子坐标系、转换关系
std_msgs/Header header
uint32 seq
time stamp
string frame_id
string child_frame_id
geometry_msgs/Transform transform
geometry_msgs/Vector3 translation
float64 x
float64 y
float64 z
geometry_msgs/Quaternion rotation
float64 x
float64 y
float64 z
float64 w
2.2、广播坐标变换
- 广播坐标转换的两种情况
广播静态坐标转换 广播器:tf2_ros::StaticTransformBroadcaster 广播方法:tf2_ros::StaticTransformBroadcaster::sendTransform(geometry_msgs/TransformStamped) 广播动态坐标转换 广播器:tf2_ros::TransformBroadcaster 广播方法:tf2_ros::TransformBroadcaster::sendTransform(geometry_msgs/TransformStamped) 广播方法: 1、发送一个TransformStamped消息 void sendTransform (const geometry_msgs::TransformStamped &transform) 2、发送一组TransformStamped消息 void sendTransform (const std::vector< geometry_msgs::TransformStamped > &transforms) -
广播静态坐标转换
static tf2_ros::StaticTransformBroadcaster static_br; geometry_msgs::TransformStamped static_tfStamped; static_tfStamped.header.stamp = ros::Time::now(); static_tfStamped.header.frame_id = "parent_frame"; static_tfStamped.child_frame_id = "child_frame"; static_tfStamped.transform.translation.x = atof(x); static_tfStamped.transform.translation.y = atof(y); static_tfStamped.transform.translation.z = atof(z); tf2::Quaternion quat; quat.setRPY(atof(wx), atof(wy), atof(wz); static_tfStamped.transform.rotation.x = quat.x(); static_tfStamped.transform.rotation.y = quat.y(); static_tfStamped.transform.rotation.z = quat.z(); static_tfStamped.transform.rotation.w = quat.w(); static_br.sendTransform(static_tfStamped); -
广播动态坐标转换
void callback(const xxx& msg)
{
 static tf2_ros::TransformBroadcaster br;
 geometry_msgs::TransformStamped tfStamped;

 tfStamped.header.stamp = ros::Time::now();
 tfStamped.header.frame_id = "parent_frame";
 tfStamped.child_frame_id = "child_frame";
 tfStamped.transform.translation.x = msg->x;
 tfStamped.transform.translation.y = msg->y;
 tfStamped.transform.translation.z = msg->z;

 tf2::Quaternion q;
 q.setRPY(msg->wx, msg->wy, msg->wz);
 tfStamped.transform.rotation.x = q.x();
 tfStamped.transform.rotation.y = q.y();
 tfStamped.transform.rotation.z = q.z();
 tfStamped.transform.rotation.w = q.w();

 br.sendTransform(tfStamped);
}
2.3、监听坐标转换
-
监听坐标转换
监听坐标转换
监听器:tf2_ros::TransformListener
监听缓存设置
缓存器:tf2_ros::Buffer 默认10s缓存
监听方法
geometry_msgs::TransformStamped     lookupTransform (const std::string &target_frame, const std::string &source_frame, const ros::Time &time, const ros::Duration timeout) const
#include <tf2_ros/transform_listener.h> tf2_ros::Buffer tfBuffer; tf2_ros::TransformListener tfListener(tfBuffer); try { transformStamped = tfBuffer.lookupTransform("turtle2", "turtle1",ros::Time(0)); } catch (tf2::TransformException &ex) { ROS_WARN("%s",ex.what()); ros::Duration(1.0).sleep(); continue; }
3、问题
/usr/bin/env: “python”: 没有那个文件或目录
- 背景
ubuntu20.04 roslaunch turtle_tf turtle_tf_demo.launch - 解决
sudo update-alternatives --install /usr/bin/python python /usr/bin/python3 1000TypeError: cannot use a string pattern on a bytes-like object
https://blog.csdn.net/xiaowang_tongxue/article/details/108298544
- 问题
Listening to /tf for 5.0 seconds Done Listening b'dot - graphviz version 2.43.0 (0)\n' Traceback (most recent call last): File "/opt/ros/noetic/lib/tf/view_frames", line 119, in <module> generate(dot_graph) File "/opt/ros/noetic/lib/tf/view_frames", line 89, in generate m = r.search(vstr) TypeError: cannot use a string pattern on a bytes-like object - 解决
sudo gedit /opt/ros/noetic/lib/tf/view_frames88 print(vstr) vstr=str(vstr) //加入这个... 89 m = r.search(vstr)